Seven chapters — one road
Everything you need before your first trade: how we think, how the market works, how the app works, and how to protect your capital, and how to read the Sniper Pro scanner. Around 45 minutes, start to finish.
Work through it in order. Chapters 3 and 4 are meant to be done with MetaTrader 5 open next to you.
Mindset and rules
JIFU is a community of people who trade with a plan, not on luck. Before you open the app or look at a chart, you need to understand how we approach trading — because that decides your results more than any single trade does.
Trading, for us, is not gambling and not a way to get rich quickly. Anyone who starts there loses, almost every time. Trading is a craft: a skill you build like any other — through repetition, discipline and patience. Nobody expects you to be perfect in your first week. We expect you to take the process seriously.
At the start, signals take the analysis off your shoulders — but not the responsibility. Your job in the first weeks is not to earn as much as possible. Your job is to execute the process cleanly: read the signal, limit the risk, stick to the plan. The account grows as a result of that, not the other way round.
Seven rules — from day one
Short, concrete, not up for negotiation. Bookmark this page and come back to it every time you feel unsure.
Why so strict? Because almost nobody loses in this market for knowing too little. They lose because they break their own rules at a weak moment. These seven points are your protection from yourself.
Understand trading
We go step by step, in the order you will actually meet things: first what you see on the chart (candles, levels, trends), then how the market works, and finally how you take part in it (orders, SL/TP). Plain language, no prior knowledge assumed. Gold is the example throughout, because that is what the community trades — but everything works the same way on any instrument.
1 · How to read a chart — candles
A chart is made of candles. One candle is the story of price over one slice of time — on M15, fifteen minutes. Each has two parts: the body, the thick section from the opening to the closing price, and the wicks, thin lines marking the highest and lowest points price reached along the way. A green candle means price rose, a red one that it fell. That is the whole idea.
2 · Pips, points, dollars — how we measure movement
Movement has to be measured somehow. On forex people speak in pips (on EURUSD a pip is a change of 0.0001). On gold it is simpler: we speak in dollars, and the app shows points — 1 dollar of movement = 100 points. So when MT5 shows “−800 points” at your Stop Loss, that is exactly 8 $ of distance.
Why do you enter slightly worse than the price you see? Because there are always two prices: Bid (what you sell at) and Ask (what you buy at). The difference between them is the spread — the broker’s fee. You can see both at the top of the chart in MT5 (SELL and BUY).
3 · Why price moves at all
Every instrument is bought and sold all over the world, around the clock. When more participants want to buy than to sell, price rises — and the other way round. News, interest-rate decisions and large institutions keep shifting that balance. Good analysis looks for the places in those moves where the possible reward clearly outweighs the risk — and that is exactly where the signals you receive come from.
4 · When the market is alive — sessions and news
Gold trades 24 hours a day, Monday to Friday — at the weekend the market is closed. But not every hour is equal: the biggest movement comes with the London session and the New York open. That is when most signals arrive.
News: major releases — US inflation, interest rates, jobs data — can move gold by more than ten dollars in a minute. Don’t panic: limiting the damage is the Stop Loss’s job. And if a signal tells you to wait until after the release, you wait.
5 · Support and resistance — floor and ceiling
Support is a level where falling price tends to stop and turn back up — like a floor. Resistance is where rises run out of room — like a ceiling. The more times price has bounced off a level, the more it matters. Signal entries very often sit exactly at levels like these.
6 · Three states of the market — trends
The market is always in one of three states. You recognise them by the pattern of highs and lows:
The market does not go in a straight line — it rises in waves: an impulse up, a short reaction, the next impulse. Every high and low is higher than the last.
Price moves sideways between support and resistance. The market is waiting.
The mirror image: an impulse down, a reaction up, the next impulse down. Every high and low is lower.
7 · Liquidity — where the orders sit
One last piece, in its simplest form. Liquidity means the places where other traders’ orders are stacked up: their stop losses and their entries. There is most of it just above highs and just below lows. That is why price often first “reaches” above a high (or below a low), collects those orders, and only then turns in the direction it was going.
Relax — you don’t have to analyse this yourself. Behind every signal there is analysis that already takes these things into account. But once you understand candles, levels and trends, you stop guessing what is happening on the chart — and sticking to the plan gets much easier.
8 · Four basic terms
You know what you are looking at and when the market is awake. Now: how you take part.
9 · Four order types
An “order” is your instruction to the market. There is the immediate kind — and pending orders, which trigger by themselves once price reaches a level you set. This is where each one sits relative to the current price:
Plus Market Execution: enter immediately at the current price, no waiting. Which one you use is always stated in the signal. The advantage of pending orders: you don’t have to sit in front of the screen. The position opens by itself when price reaches your level.
10 · Buy Limit and Sell Limit on the chart
This is what it looks like in practice: price reaches the level of your pending order, the position opens automatically — and then price runs to the target.
11 · Stop Loss and Take Profit — your guard rails
Every position gets two automatic protection levels. Stop Loss (SL) is your insurance: when the market goes against you it closes the position automatically and caps the loss — even while you are asleep or at work. Take Profit (TP) secures the gain when the target is hit, before the market can turn back. On a buy position it looks like this:
On a sell position it is exactly mirrored: TP below the entry, SL above it. The logic stays the same — SL always sits on the side that hurts you, TP on the side that pays you.
The community’s iron rule: no position without a Stop Loss. You set it before the trade starts — never “I’ll add it later”. A trade without an SL is not a trade, it is a bet.
Your preparation
First the broker — then the platform
Before MetaTrader 5 can show you anything, you need an account with a broker. The broker holds your money and executes your trades; MT5 is only the app you operate them through — and it has nothing to log into until the broker account exists. We use QuoMarket: every screenshot in this chapter comes from that panel.
Work down this list in order. The last item is the handover to MT5 — the detailed, screen-by-screen version follows further down the page.
What MetaTrader 5 is — and why this app
MetaTrader 5 (MT5 for short) is the most widely used trading platform in the world. It does not belong to your broker — it is an independent app you can log into with almost any broker. Everything that matters happens in one place: watching prices, placing orders, managing Stop Loss and Take Profit, checking your history.
That is exactly why we work in it — and why it is worth learning once, properly: the knowledge stays useful no matter which broker you are with or which instrument you trade later. Keep the two roles apart: the broker holds your account and executes your trades. MT5 is only the cockpit.
Before you start — the checklist
Tick off what you already have. Only move on once all six are green.
Installing and logging in
Opening a demo account
Before you can execute a signal you need an account. We start with a demo — it works exactly like a real one, on virtual money. Below is the whole road, step by step: from opening the account in the broker panel to logging in inside MT5.
No account with the broker yet? Speak to the person who invited you to JIFU — they will give you a registration link. Open the account through that link, then come back here and work through the steps in order.
A note on the screenshots: they come from a live phone, so some app menus appear in the language the phone was set to. The positions of the controls are identical whatever the language.
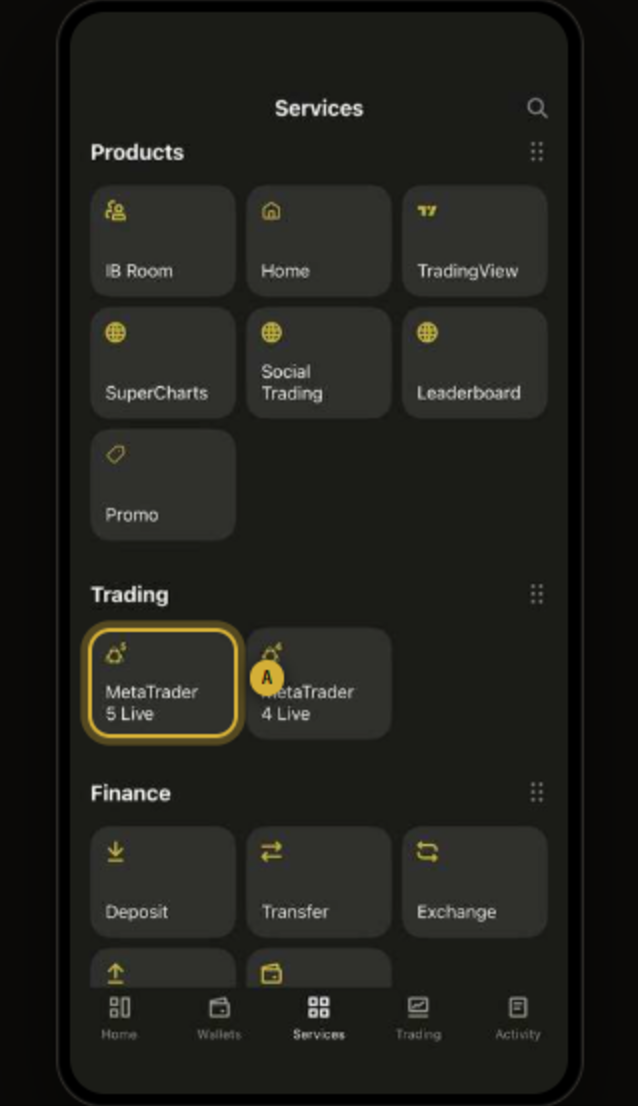
Open MetaTrader 5 Live
Log into the Quo Markets panel and open the Services tab — that is your main menu. This is where accounts are created.
Switch to Demo
The most important moment of the whole set-up. If you stay on the Live tab, you will open an account with real money. To begin with, we want demo.
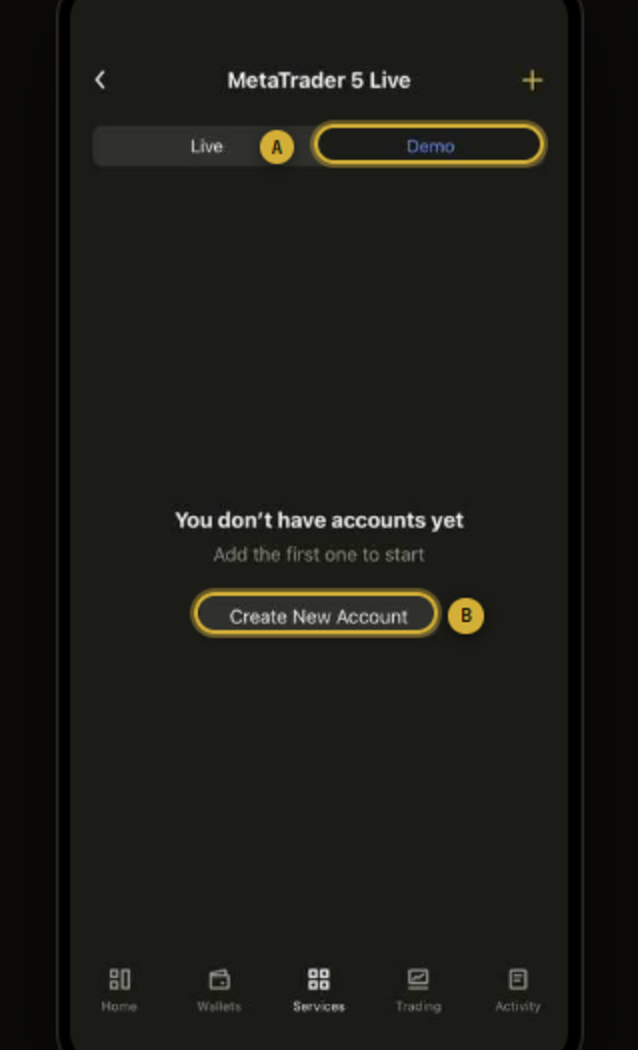
Demo or real? Start on demo and execute your first 3–5 signals there. Move to a real account only once every step feels automatic. That is not lost time — it is training.
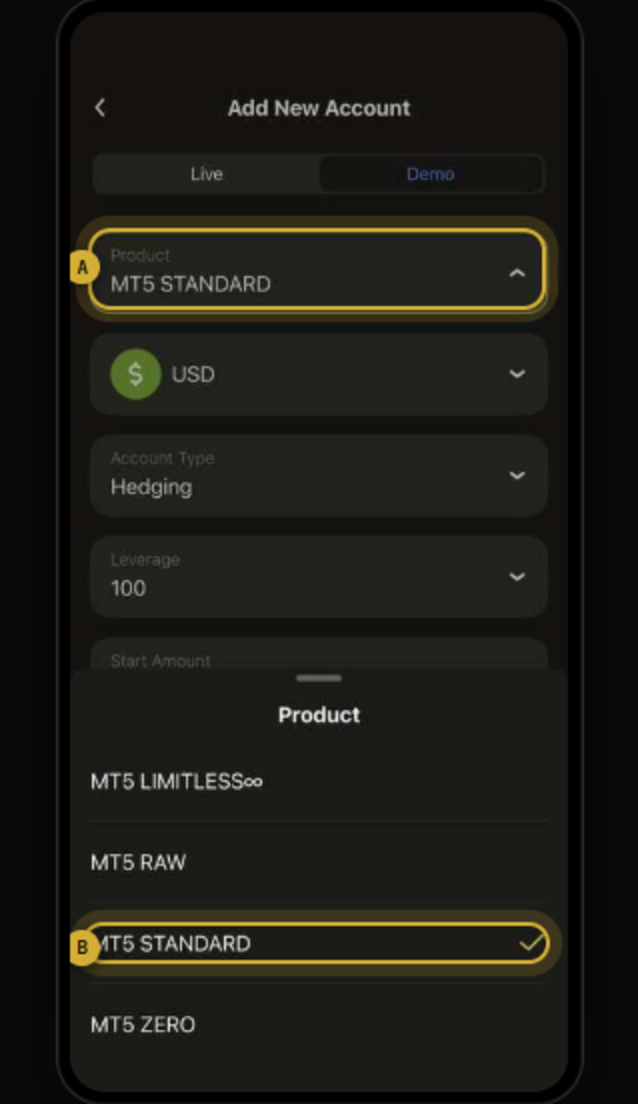
Choose the product MT5 STANDARD
Now you set the account parameters. Keep to exactly these values — the whole community works on them, so your results stay comparable with everyone else’s.
Set leverage to 1000x
Leverage lets you open larger positions with smaller capital. We set 1000x so the account behaves the same way as everyone else’s in the community.
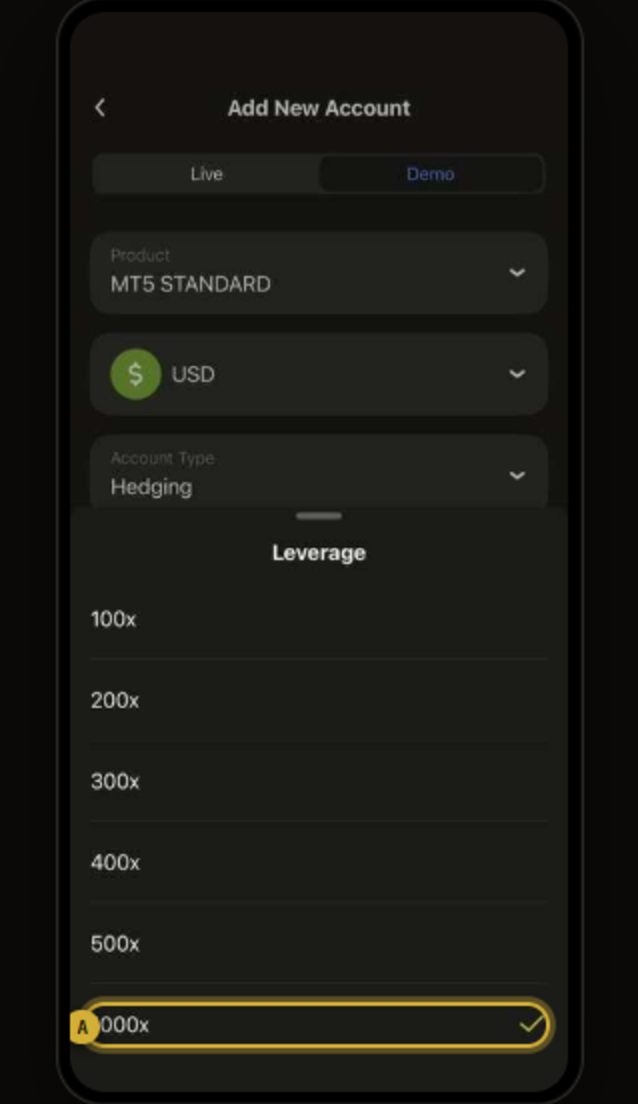
Leverage is not profit. High leverage does not mean you should trade a bigger lot — your position size always comes from the 1–2 % risk rule (Chapter 5). Leverage only makes the position possible.
Get your details from the email
Once the account exists, the broker emails you the login details. Three things are needed in MT5 — copy them exactly, with no trailing space.
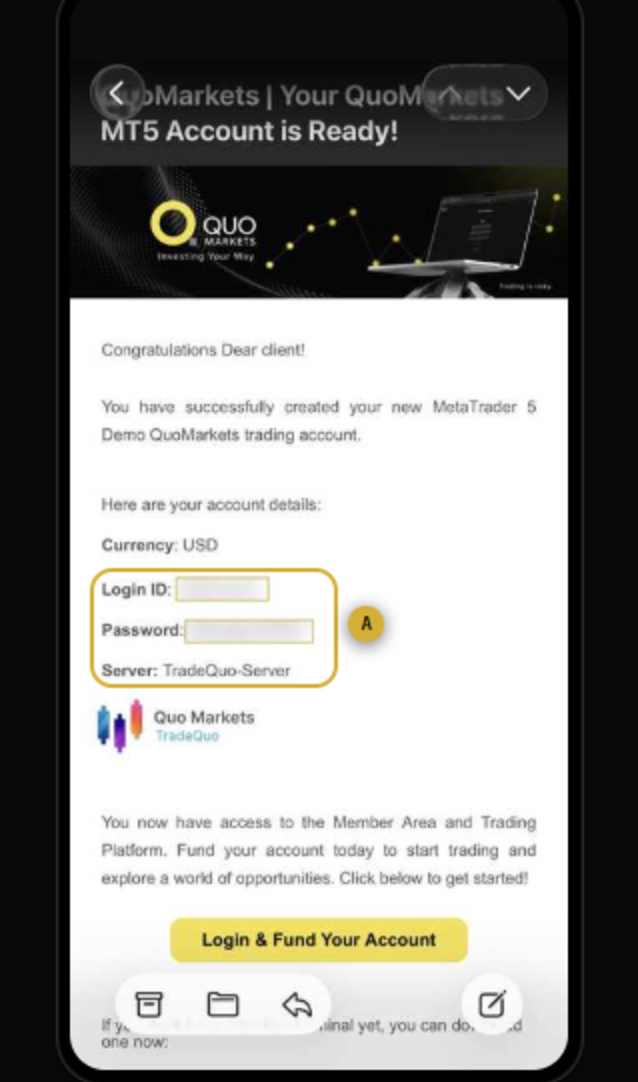
Never send these details to anyone — not to a leader, not to “support”, not to anyone in the group. Nobody from JIFU will ever ask for your account password. Anyone who does is trying to scam you.
In MT5, open a new account
You have the details — now you connect them to the MetaTrader 5 app, the same one you installed earlier in this chapter.
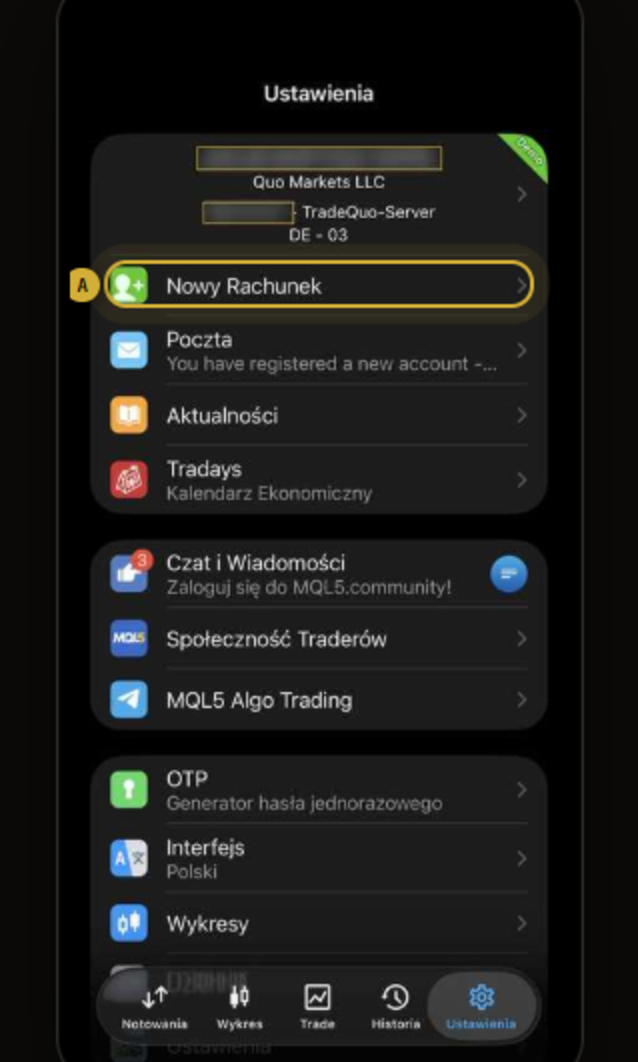
Find the server first
Watch the order here — this is where most people get lost. MT5 asks for the broker first and only then for your login. Don’t look for an account-number field yet.
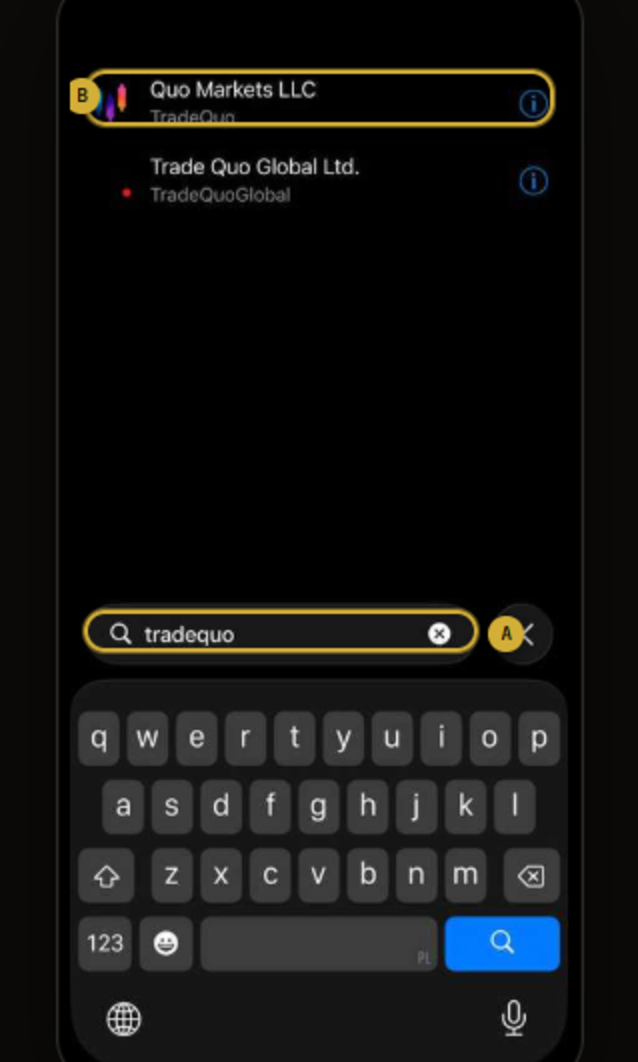
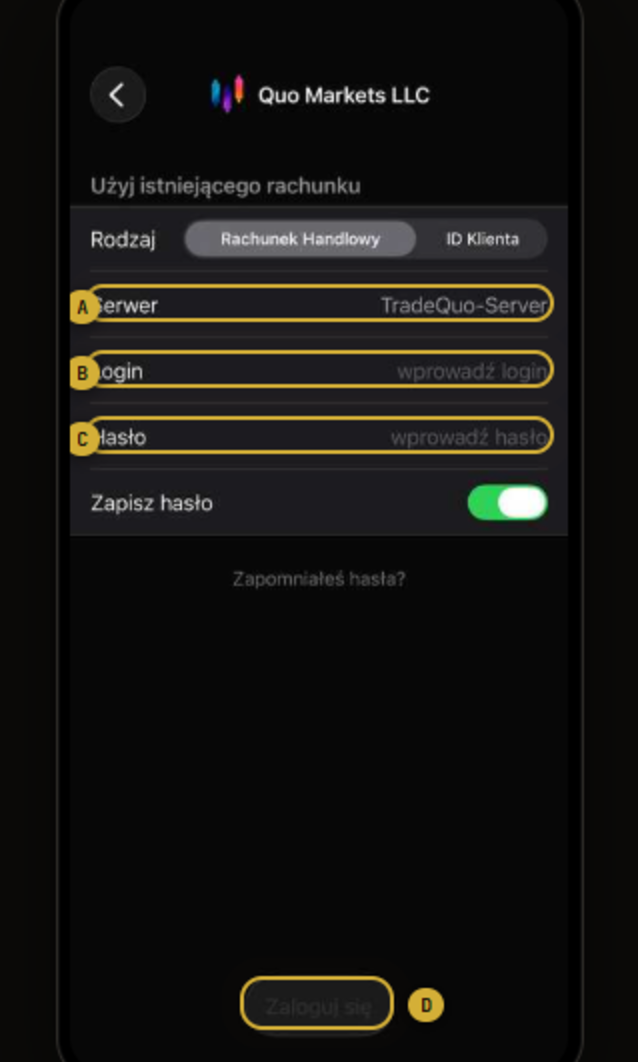
Enter the details and log in
Last step. Here you paste the login and password from the email — and the account is connected for good.
Done — check the account
If everything went well, the Trade tab shows your balance. That means the account is connected and you can move on to Chapter 4.
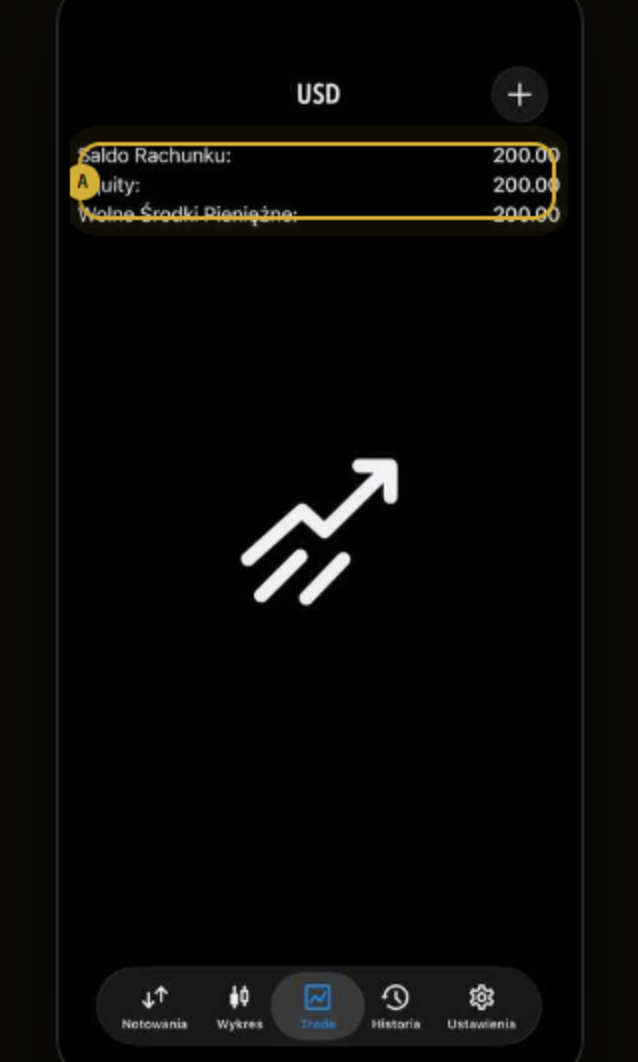
Login failed? The usual causes: the wrong server (it must be TradeQuo-Server, not TradeQuoGlobal), a space copied along with the password, or details from a different account. Check those three things — and if it still fails, ask in the group, but never share your password.
MT5 in practice
Now the practice: ten screens, real screenshots from the app, every place you tap marked. Best done with MT5 open beside you — carry out each step as you read it. That is the fastest way to learn it.
Every screenshot shows gold (XAUUSDs), because that is what the community trades. The handling is identical for every instrument — only the symbol changes.
The phone in these screenshots is not set to English throughout. Button names are given in English in the text; wherever your app’s language differs, the controls still sit in exactly the same places.
Add the instrument to your list
The Quotes tab is your home screen — the list of instruments you watch. Before you can trade something, it has to appear here. Let’s add gold.
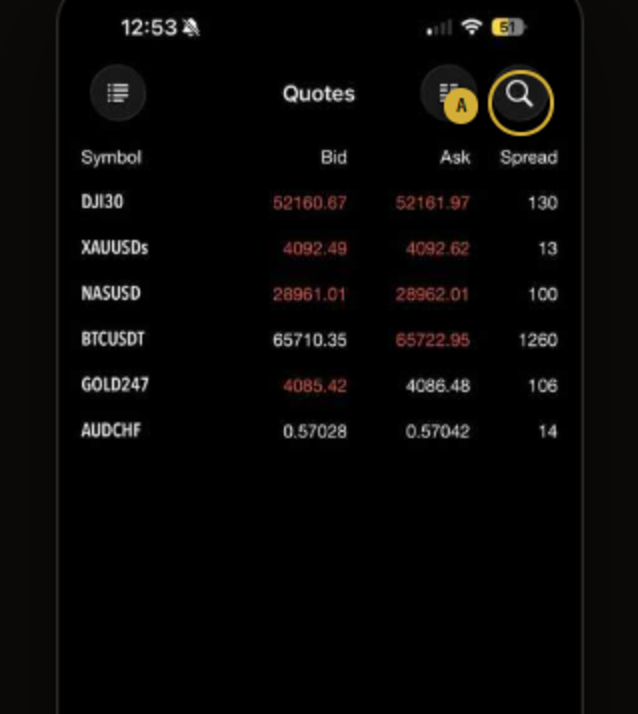
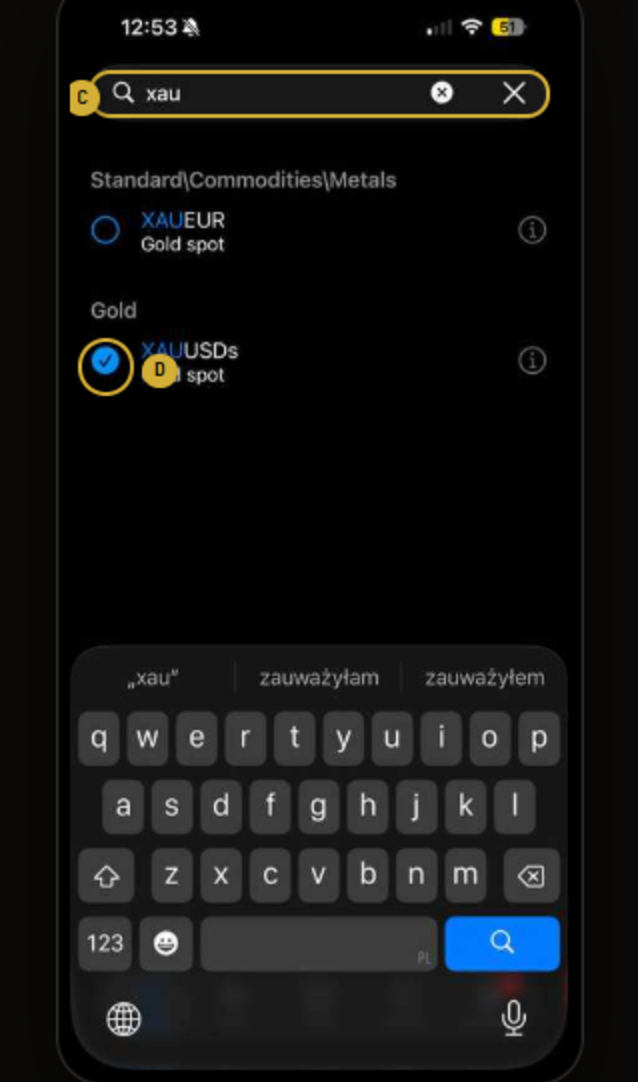
A small “s” on the end? At our broker gold is listed as XAUUSDs — the same instrument as XAUUSD in the signals. Some brokers add endings like that. Don’t let it confuse you.
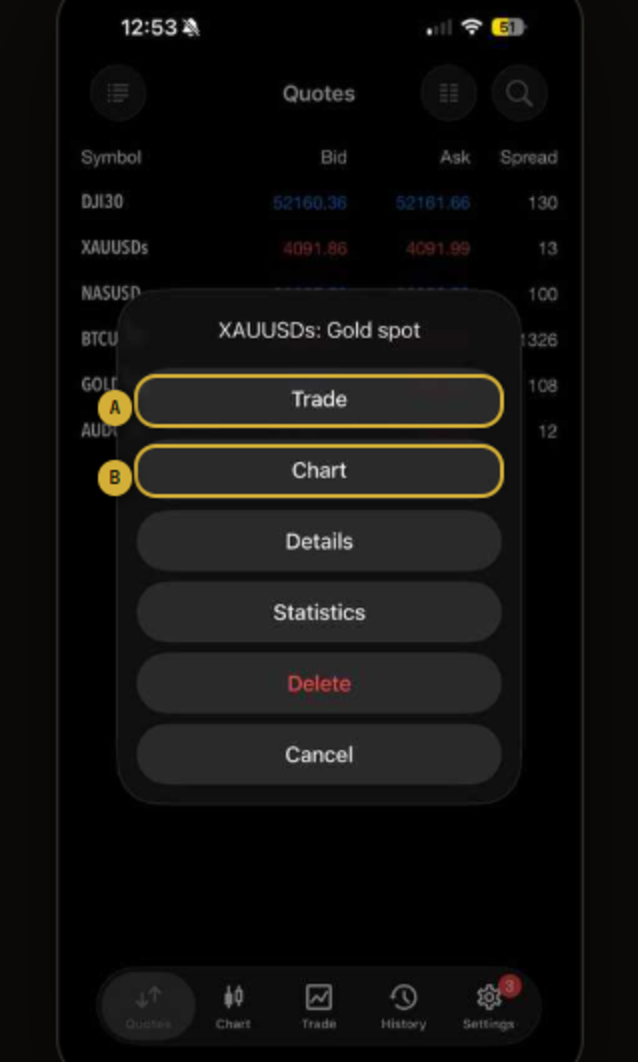
Open the chart
A chart is a picture of price over time. You need it mainly for one thing: to check where price is now — and whether the signal is still valid.
Change the timeframe
The timeframe sets how much time one candle covers. Small timeframes show every detail, large ones the wider picture. For your purpose — checking whether a signal is still current — M15 or H1 is plenty.
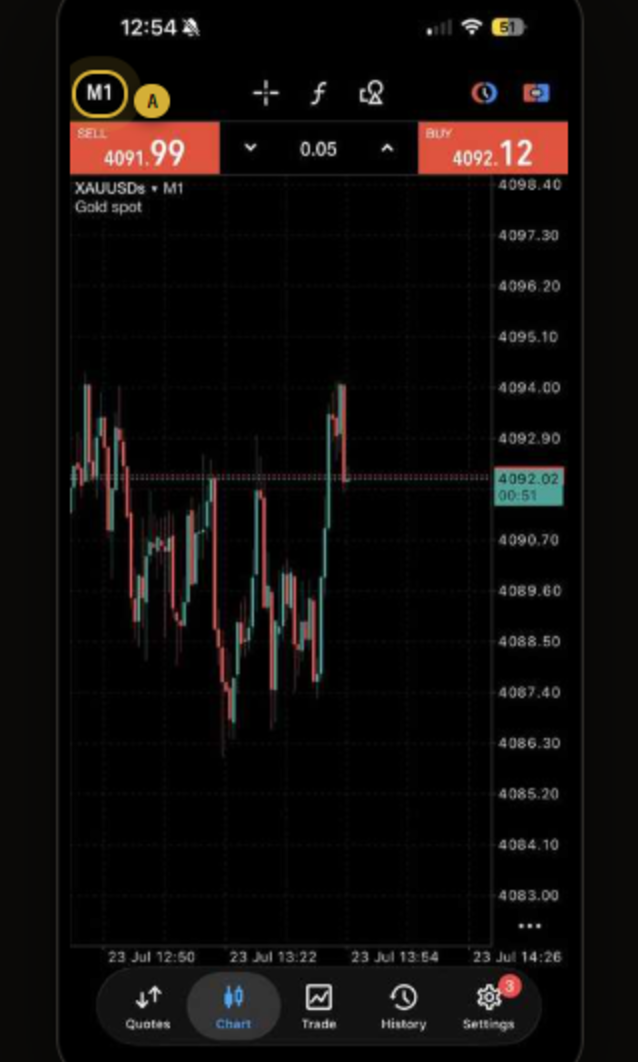
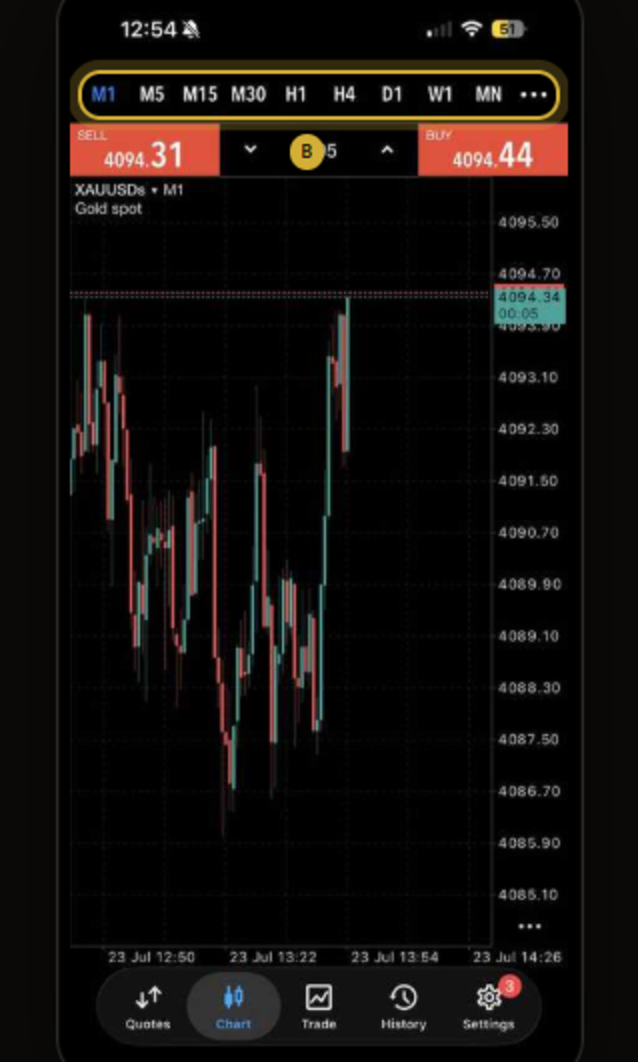
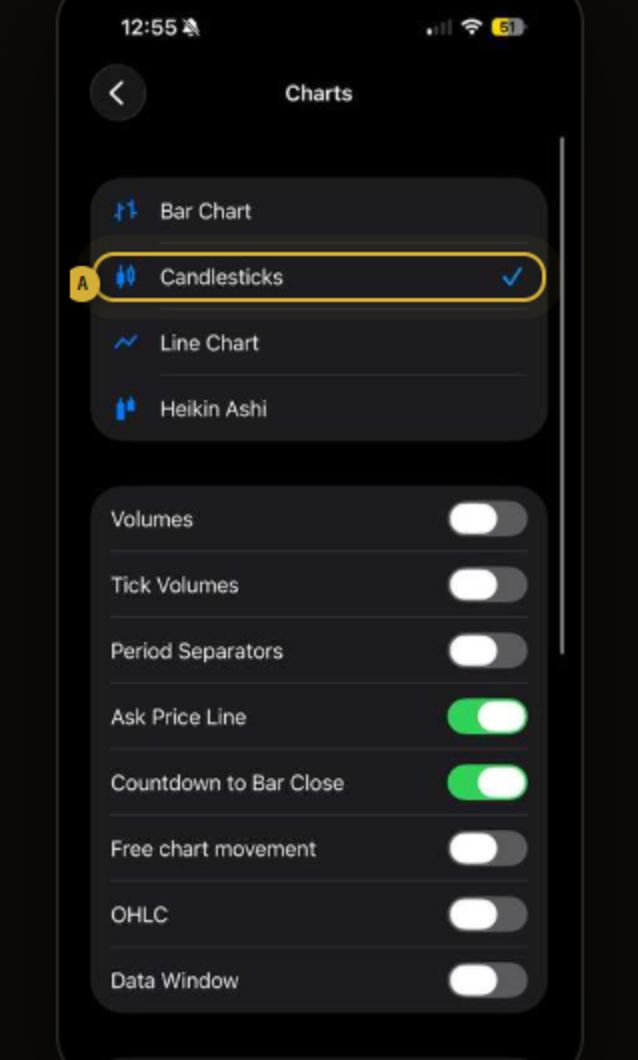
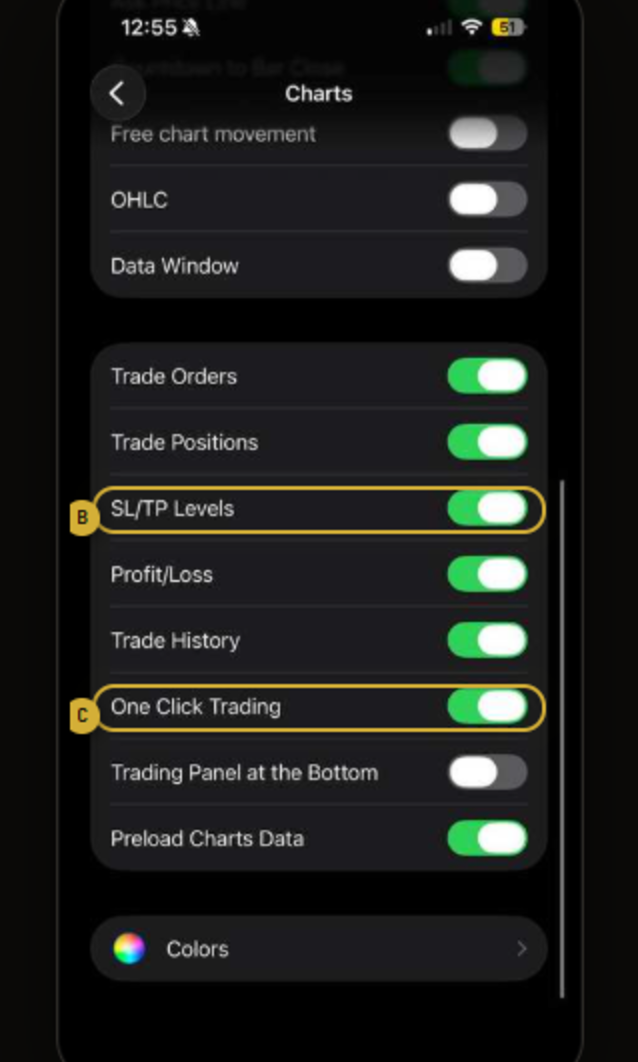
Set the chart up once and for all
Two minutes, one time — so your chart looks like the one in this guide and you can see orders, SL and TP directly on it. It makes everything that follows much easier.
Place a new order
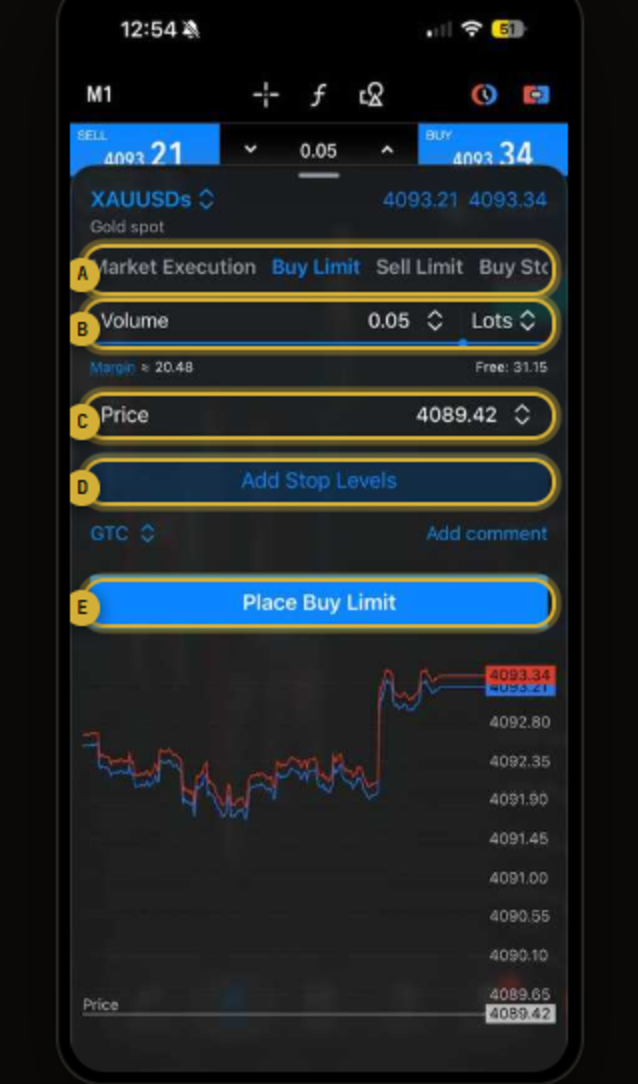
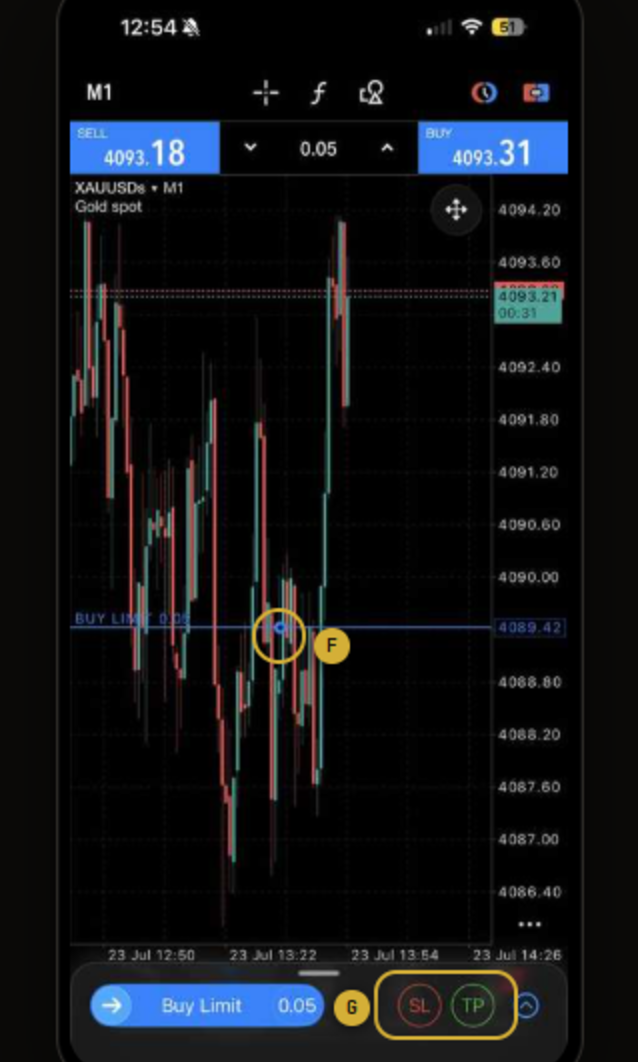
The order window is your most important screen — this is where a signal becomes a trade. Take your time the first time and work calmly through points A to E. After two or three trades the whole thing takes under 60 seconds.
Set Stop Loss and Take Profit
Now your order gets the guard rails from Chapter 2: SL as the insurance, TP as the profit target. Both belong to every order, before the trade starts. Always.
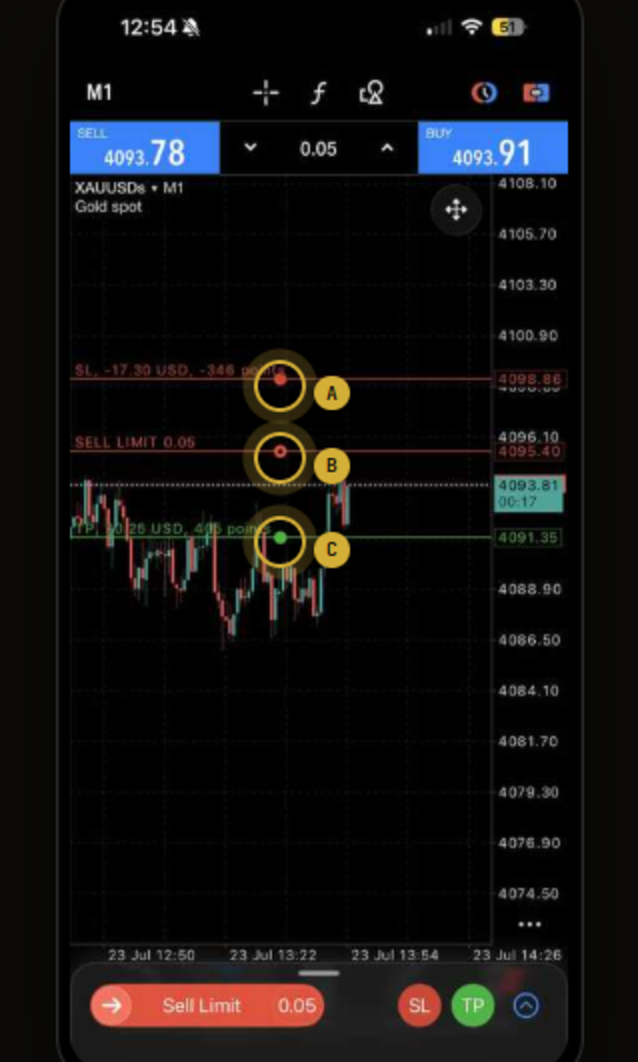
Never walk away from the phone without a Stop Loss. You set SL and TP before the position moves — never “I’ll add it later”.
Modify an open position
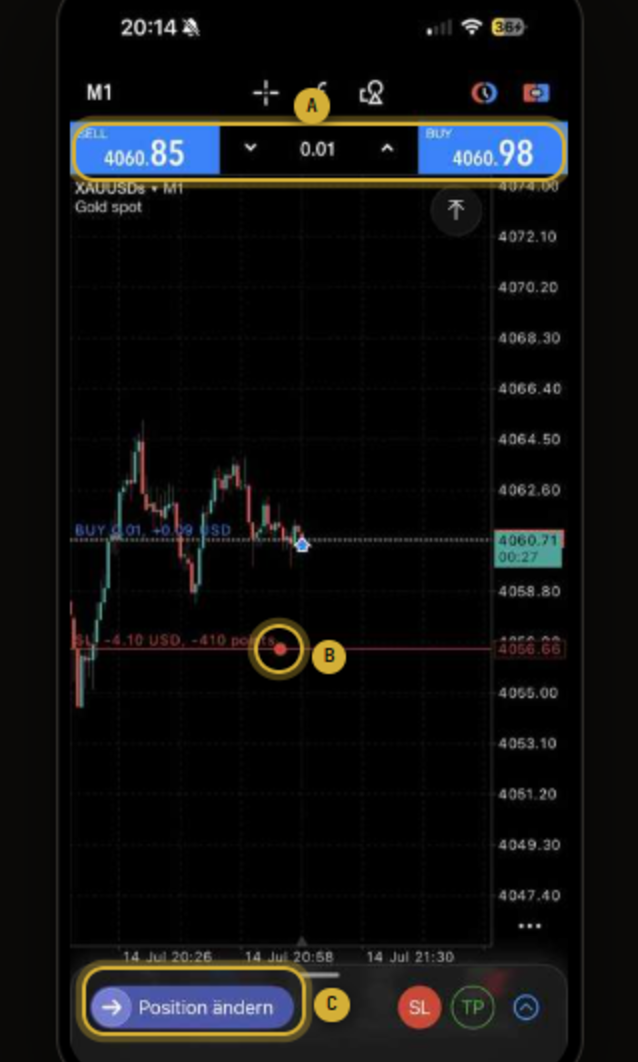
An open position is not set in stone — SL and TP can be adjusted. You need this when an update says “move the SL to break-even”: set the SL to the entry price, and the trade can no longer lose anything.
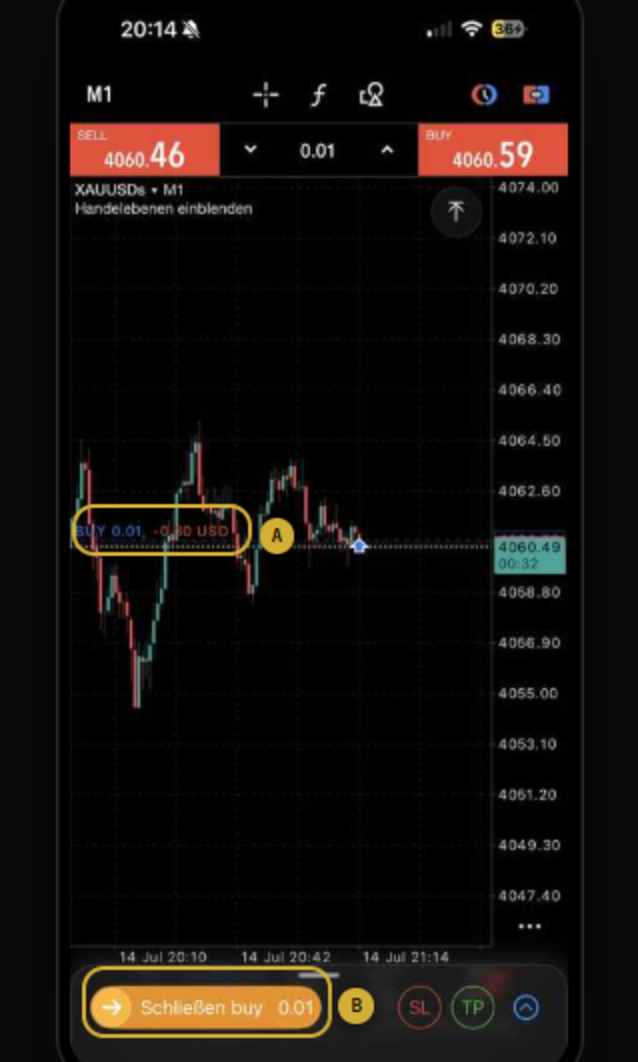
Close a position
Normally the position is closed automatically by TP or SL — that is the plan. You close by hand only in exceptional cases, for instance when an update explicitly says so.
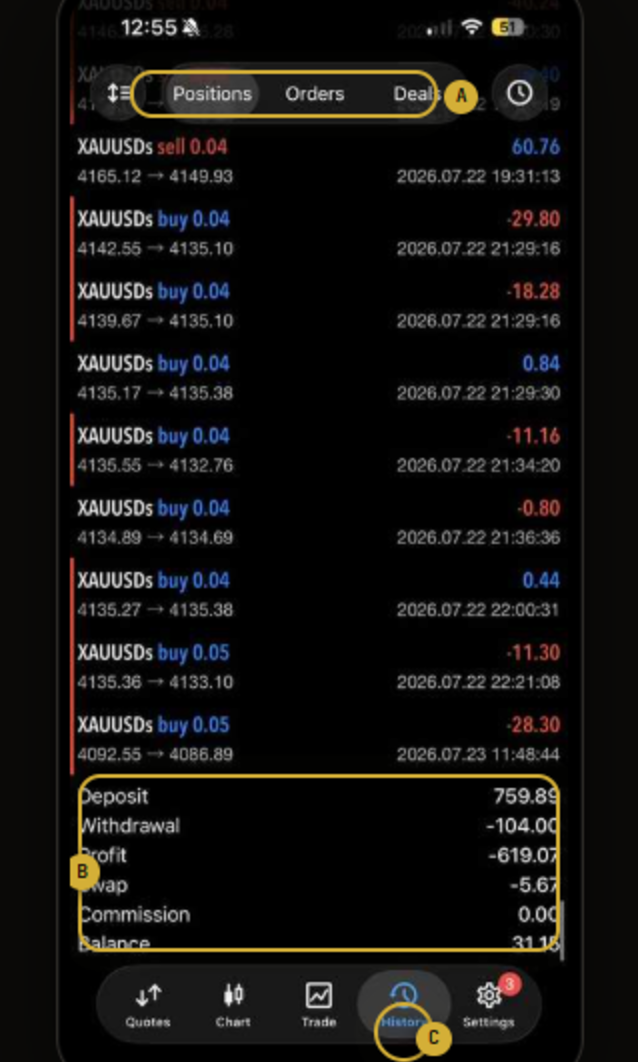
Check your history
This is where every closed trade lives — your control centre at the end of the week. And the important part: don’t only look at the profit. Check first whether you executed each trade according to plan. Early on, that matters more than the result.
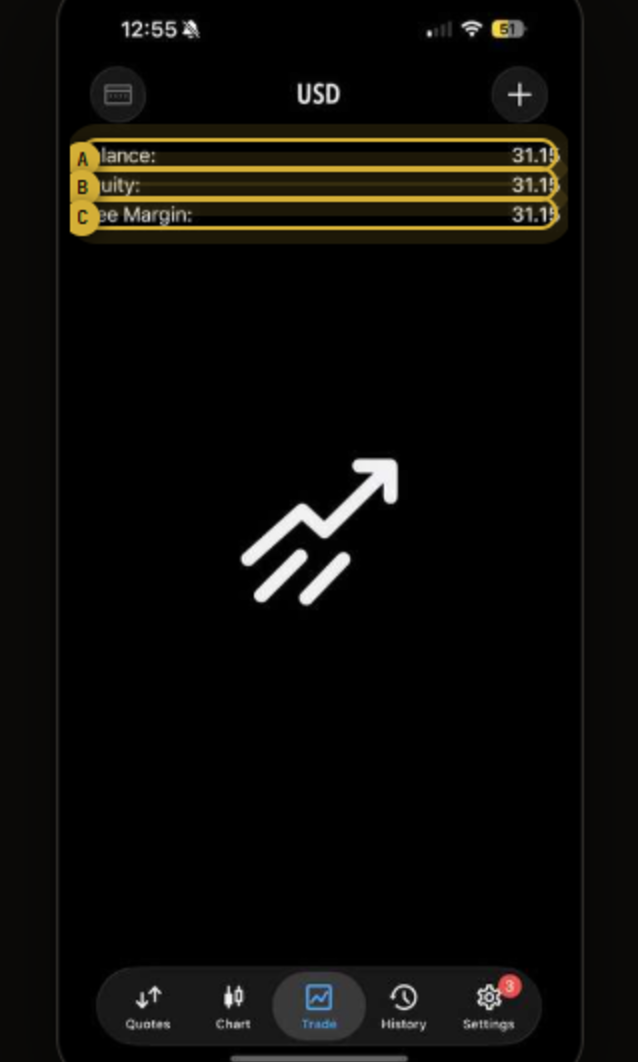
Balance, Equity and Free Margin
Three numbers describe your account — you find them at the top of the Trade tab. Anyone who understands them can see the health of their account at a glance.
Risk and position size
This is the most important chapter of the whole onboarding. The rule is simple, and it holds for every instrument and every strategy: risk at most 1–2 % of the account per trade. No more — however certain the trade looks.
Why so strict? Losing streaks happen to every trader, even with good signals. At 1 % risk per trade you come through five losses in a row almost unharmed, and you stay calm. With too large a lot the same streak throws you out of the game — and long before that it pushes you into panic decisions. Risk control is not a brake; it is the reason you are still trading months from now. It is Rule VI, in numbers.
Lot table — example on gold
For gold signals with a typical SL distance you can read the position size straight off the table. Stick to it — it keeps your risk constant whatever the size of your account.
Or work it out for your account
Enter your balance, the risk you allow yourself and the SL distance from the signal in dollars. The result is the largest lot that still respects your rule, rounded down.
The calculator works on gold, where 0.01 lots ≈ 1 USD per 1 dollar of movement. If it gives you a smaller lot than the table, take the smaller one — the calculator knows your actual SL distance.
Working with signals
A signal is a finished trade plan: instrument, direction, entry, protection levels. Your job is not to judge it — only to execute it cleanly and completely. Every signal carries the same elements. Tap each line to see what it means (example: gold).
From signal to order — your workflow
Pro technique with TP1 + TP2: open two smaller orders instead of one large one — same entry, same SL, but one with TP1 and one with TP2. You bank the first profit early and let the rest run to the second target. The two lots together must not exceed your normal size.
SL to break-even — once 1:1 is reached
An important rule for running a position: once price has moved in your favour by the same distance as your SL (a ratio of 1:1), move the Stop Loss to the entry price — to break-even (BE). From that moment the trade can no longer lose anything: the worst case is zero, and the TP is still in play. Technically you do it through Modify Position (step 07).
Note: BE is protection, not nervousness. Don’t move the SL closer than 1:1 “because you’re scared” — that suffocates the trade and is one of the most common mistakes. The rule is simple: 1:1 → BE, and before that you touch nothing. And if an update to the signal says otherwise, you follow the update.
60-second checklist
Five questions before you tap “Place”. If you can answer yes to all of them, the trade is cleanly prepared.
Sniper Pro
Read signals on JIFU, execute on MT5. The scanner tells you whether a trade exists and which side it is on; everything you learned in chapters 4 to 6 is how you place it. Work down the list, and treat the five-step checklist at the end as the gate: no gate, no trade.
The lot you place still comes from Chapter 5, and SL/TP still go in before the trade moves — Sniper Pro replaces the analysis, not the risk rule.
Trader’s glossary
Every term from this onboarding — and the ones you will meet in signals and sessions — explained short and plain. Come back here whenever a word is unclear.
You are ready to start.
You know how we think, how the app works and how to protect your capital. From here on, one thing counts: clean execution, signal after signal. It is not speed that decides — it is consistency.
Trading CFDs and leveraged products (e.g. gold, currencies, indices) carries significant risk and can lead to the loss of all invested capital. The majority of retail investor accounts lose money when trading CFDs. The signals and content provided are not investment advice or a recommendation in the regulatory sense, nor an inducement to buy or sell financial instruments; they serve educational and informational purposes only. Past results are no guarantee of future ones. The screenshots come from the MetaTrader 5 app; appearance and names may differ slightly depending on the app version and the broker. Trade only with capital whose loss you can afford, and take every decision on your own responsibility.